Foreword:
In the narrower sense, error refers to a false assumption or opinion or a false belief, whereby the assertor, opinionator or believer considers the wrong thing to be right. In contrast to a lie, in which the truth has been deliberately distorted, an error arises unintentionally from false information or erroneous conclusions.
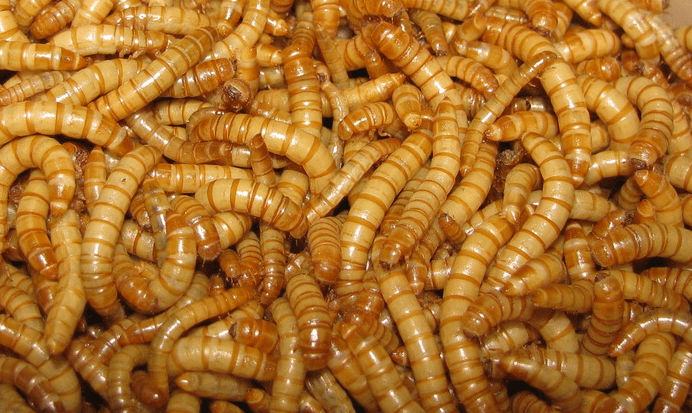
Don’t worry, you’ve come to the right place, and it’s also about mealworms. However, thanks to this name, we have this introduction. It’s not actually a worm but a larva, or have you ever seen a worm shed its skin? But once it’s in your head, you can’t get rid of it that quickly. So the mealworm will always be a worm, and the coconut will always be a nut. Before you have to google it, the coconut is actually a drupe, but who knows for sure?
General Information:
Black beetles are found all over the world and are one of the most common crop predators. Outdoors, they live in mulm, rotting wood and bird nests, just like their larvae. In the human environment, they inhabit flour and other cereal products and prefer to live in dark and warm places.
Mealworms are still indispensable for feeding all terrarium inhabitants, even if they have become considerably less important. When I started keeping terrariums around 27 years ago, feeding terrarium animals was still a real problem. The whole hobby was hardly commercialized at that time and required a great deal of personal commitment. In summer, we resorted to meadow plankton and in winter we only fed mealworms. Fortunately, this has changed today, as the nutritional table does not reveal much good about the mealworm.
Why should we continue to breed mealworms? My main argument is the independence from supply difficulties of the feed animal breeders. There are often fluctuations in the winter months, as many do not ship at all, some only with a considerable surcharge, as the additional work is considerable. I have also often experienced complete breeders collapsing and being left high and dry. So it’s a kind of emergency supply that I operate on a small scale.
Of course, mealworms are now also a source of protein in our diet. So it’s great to grow your own organic larvae, always knowing “I know what’s in it”. Anyone who likes to eat hamburgers and is looking for a recipe will find it here.
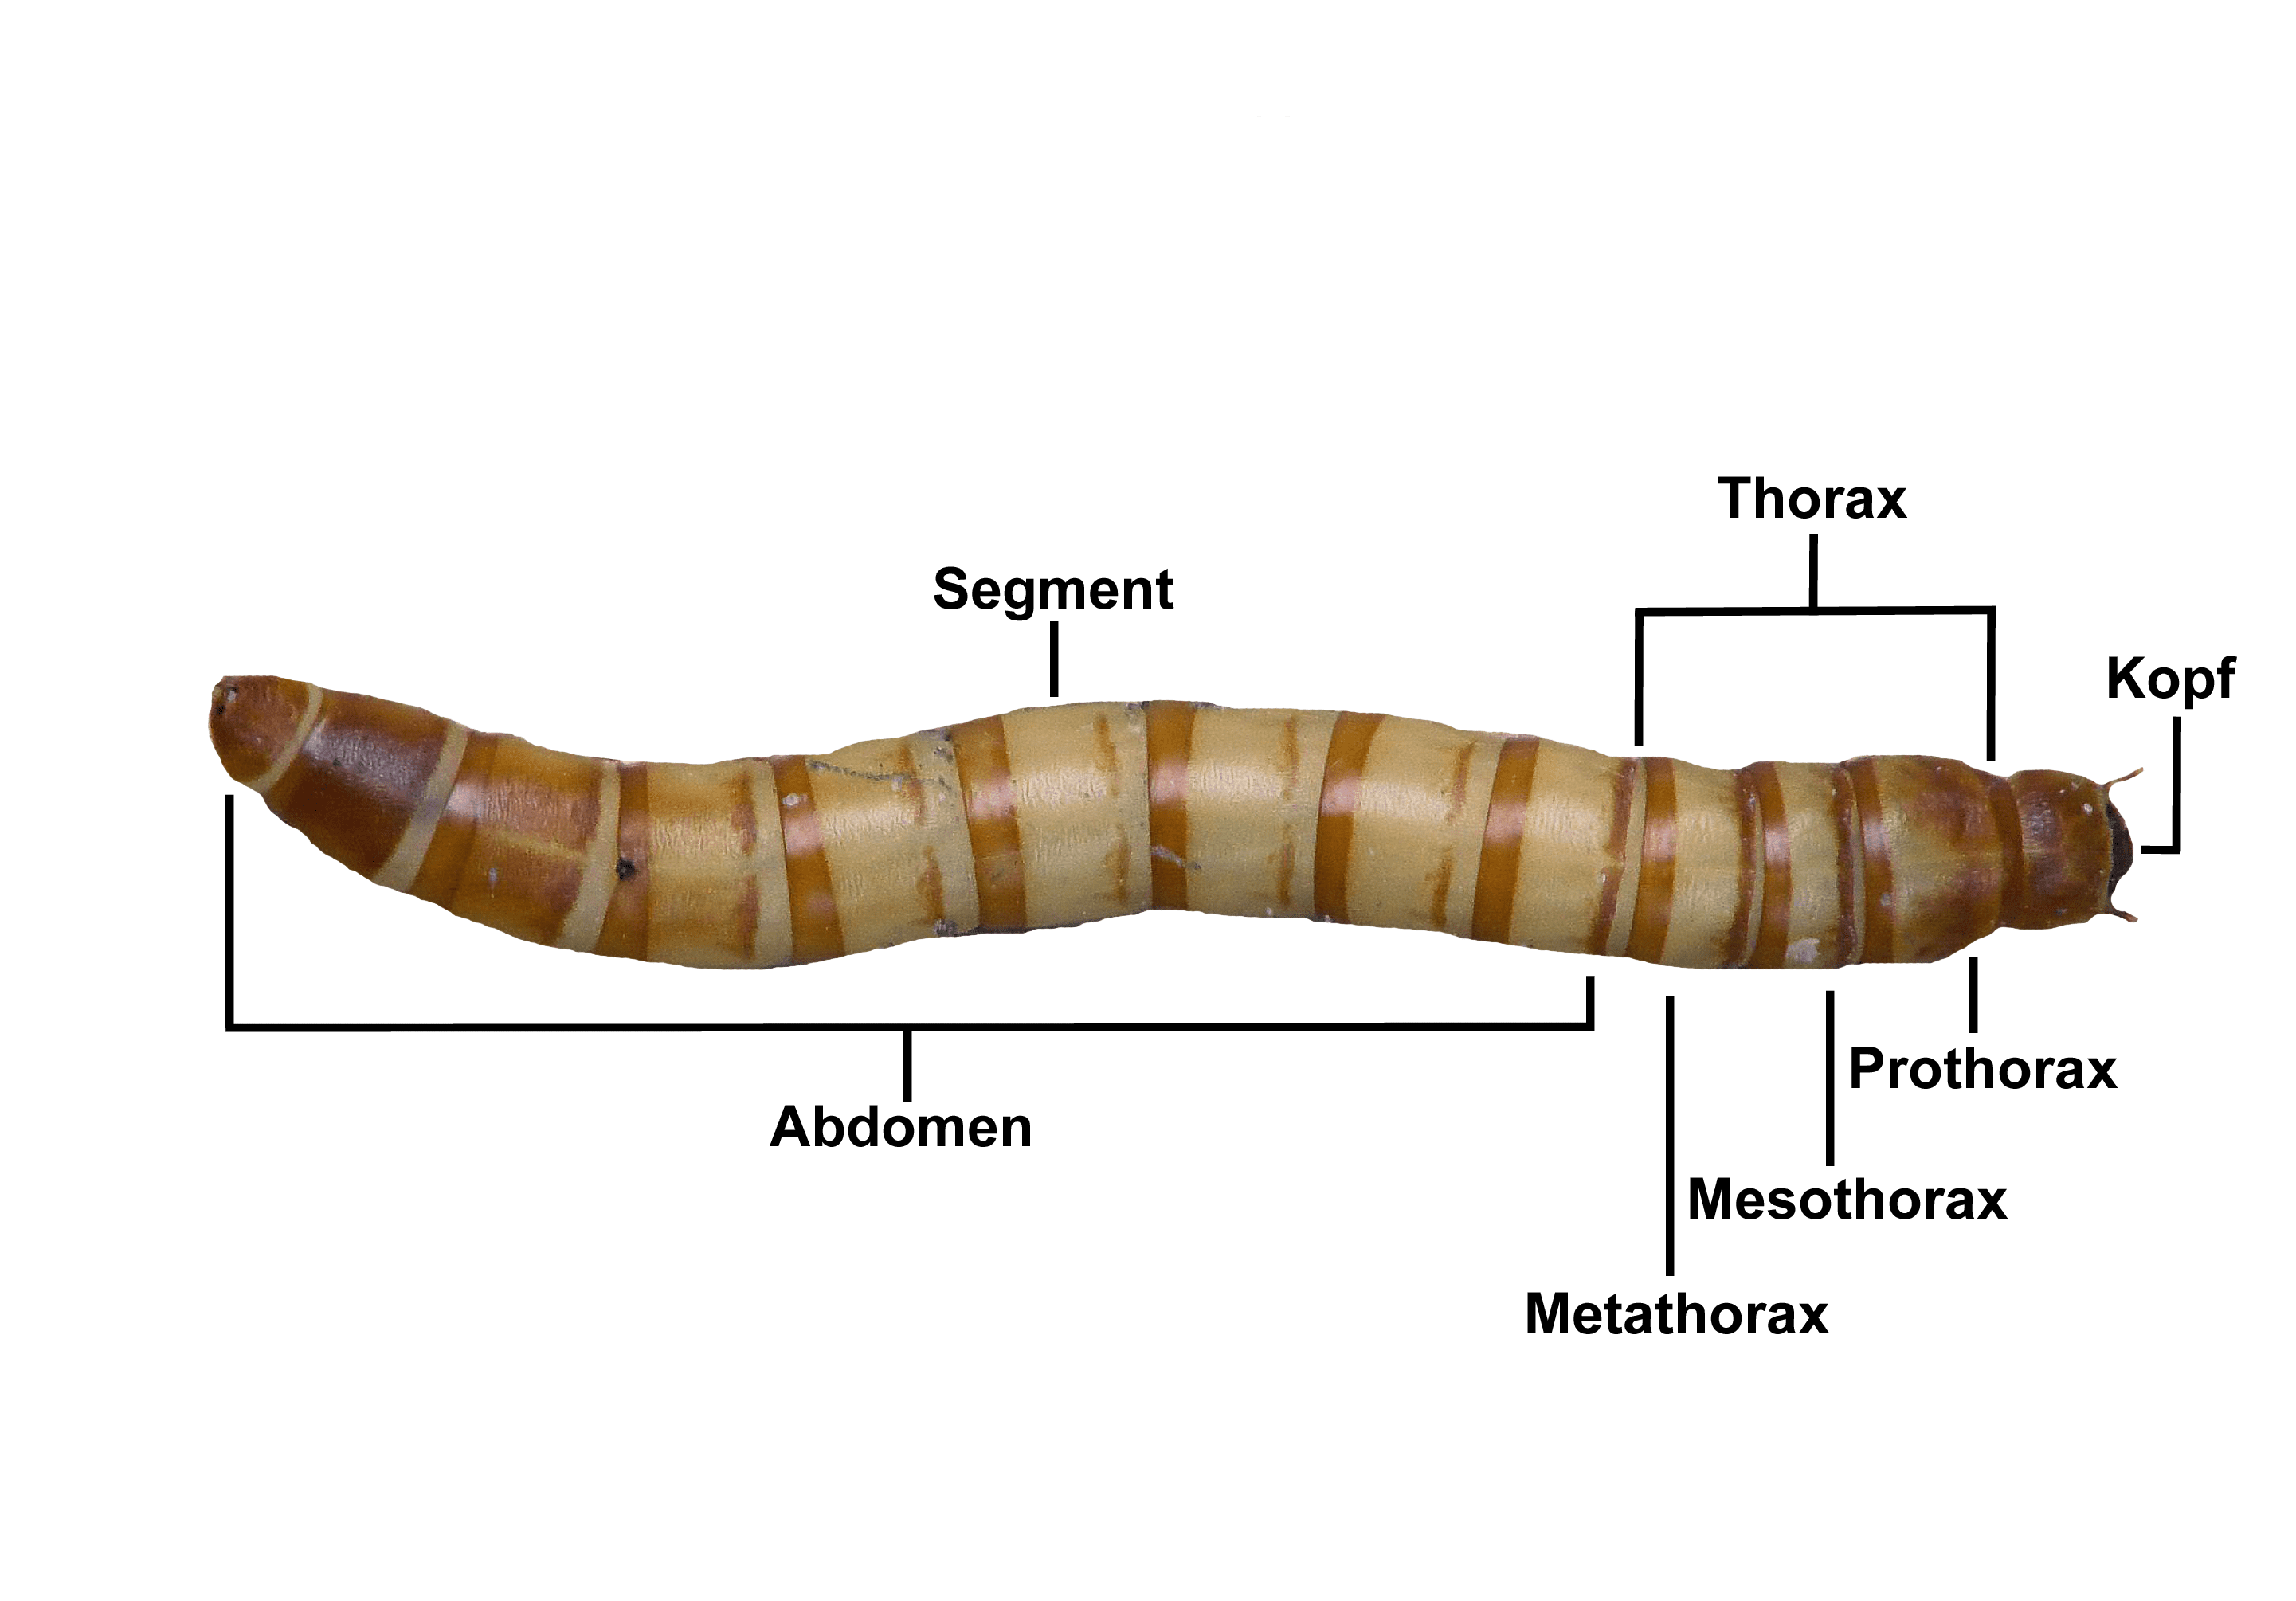
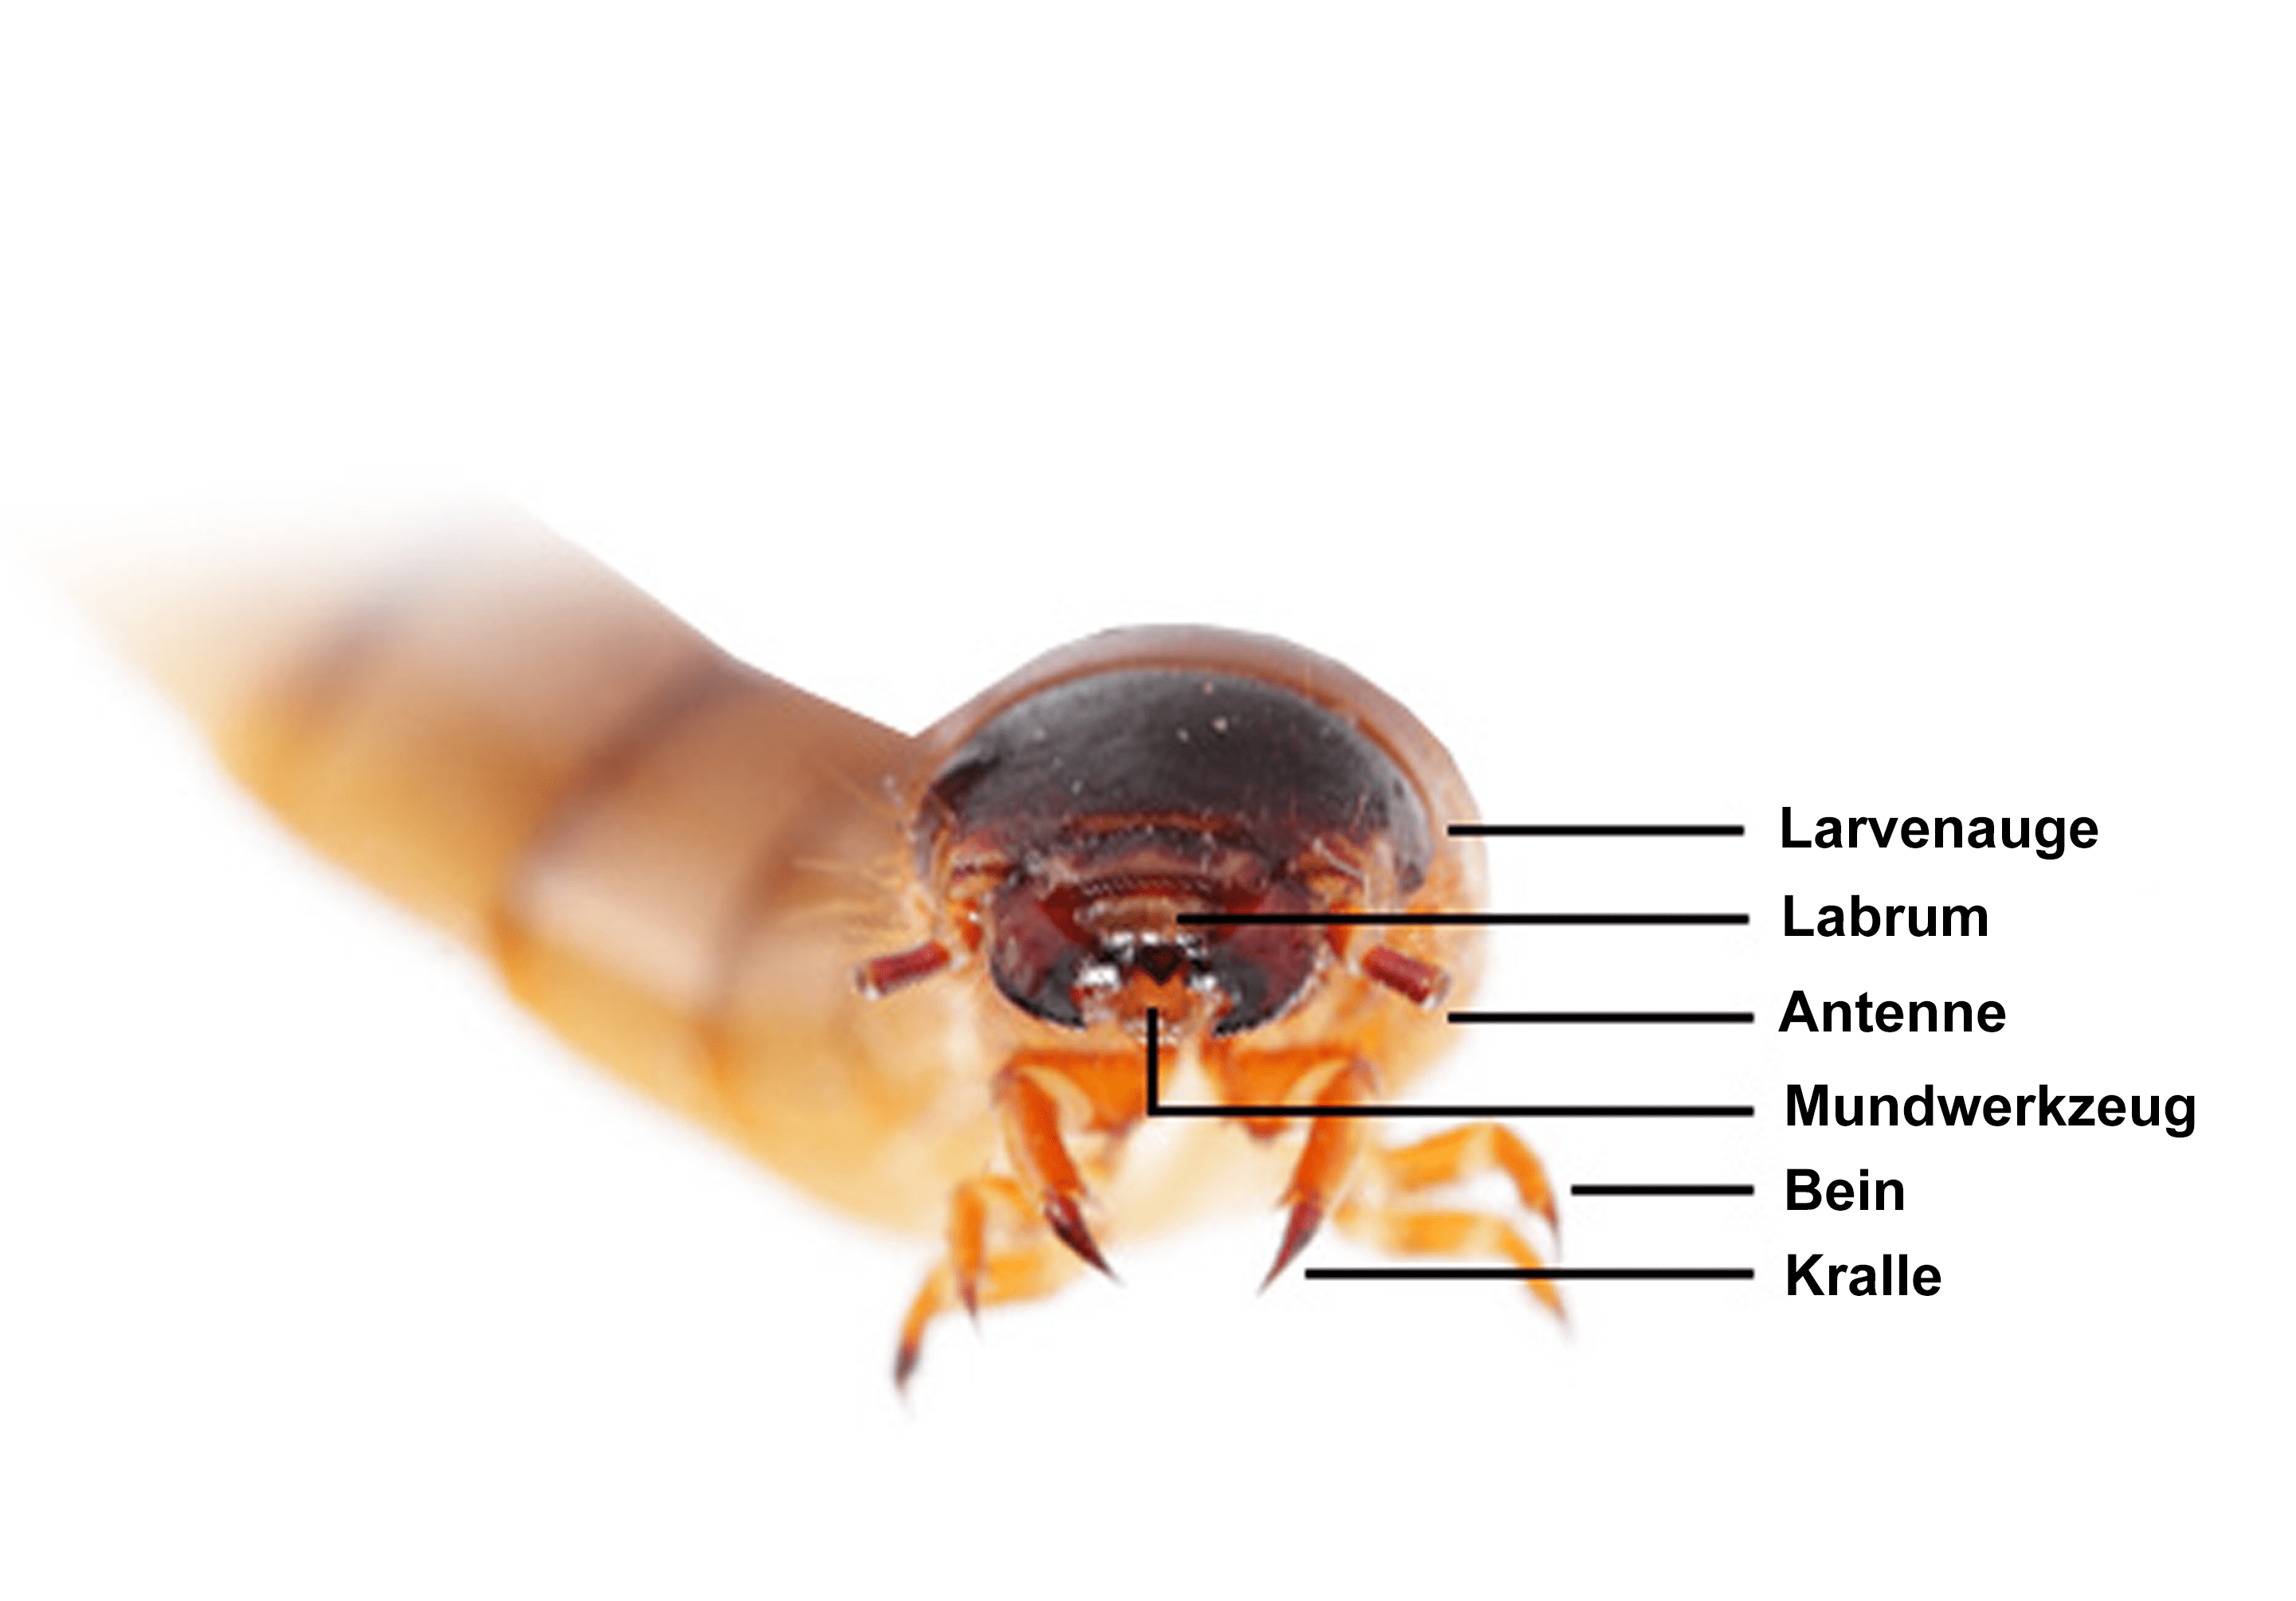
Anatomy:
Breeding:
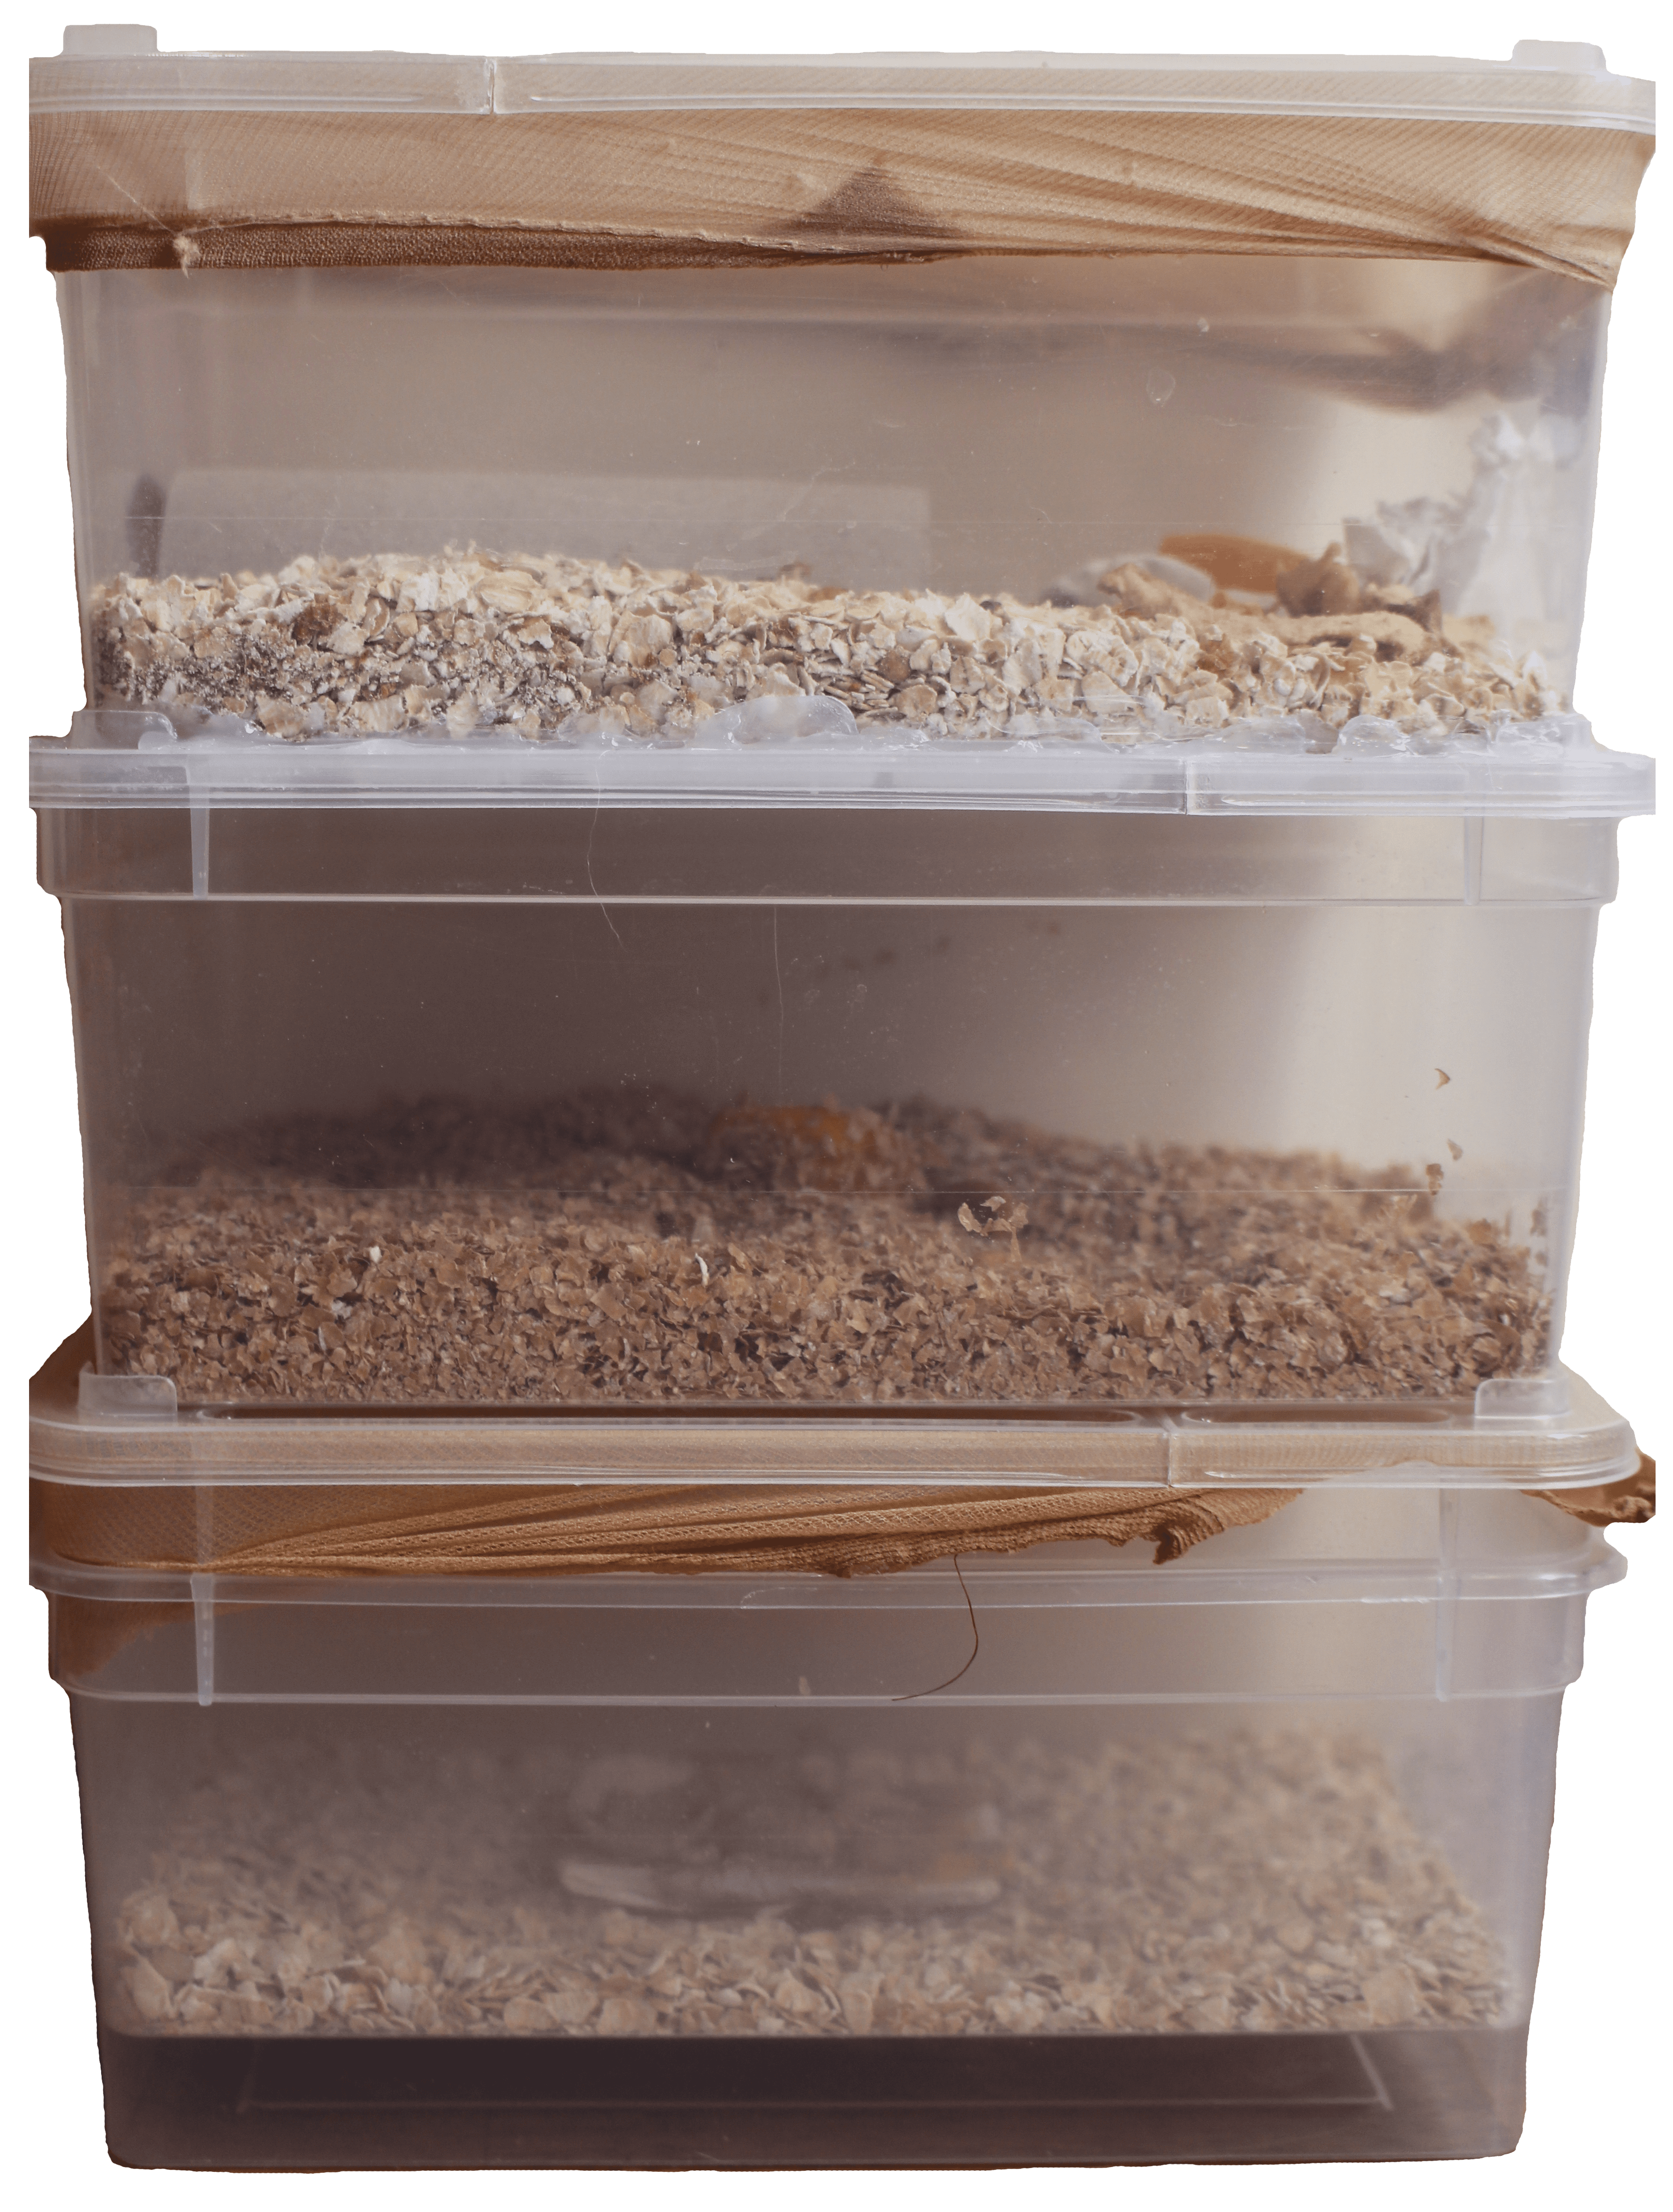
I use BraPlast cans with a capacity of 1.3 liters as breeding containers, as I rarely feed mealworms. In general, you can use anything you like, but you should have at least 4 of them. Do not use wood or cardboard, as the mealworms will eat their way out. Depending on how large you want to breed, you should adapt your containers. Drawer boxes have proven to be very practical.
Before you can start breeding, a small optimization of the boxes / drawers is necessary. All containers need a ventilation surface. I make them Drosophila-tight to prevent flies from breeding. I prepare the second box/drawer as follows:
- Cut out the base, leaving a margin for gluing (min. 1 cm)
- Glue wire gauze with a mesh width of 1.5 mm as a floor replacement
- Cut out the lid so that the wire gauze base fits in perfectly
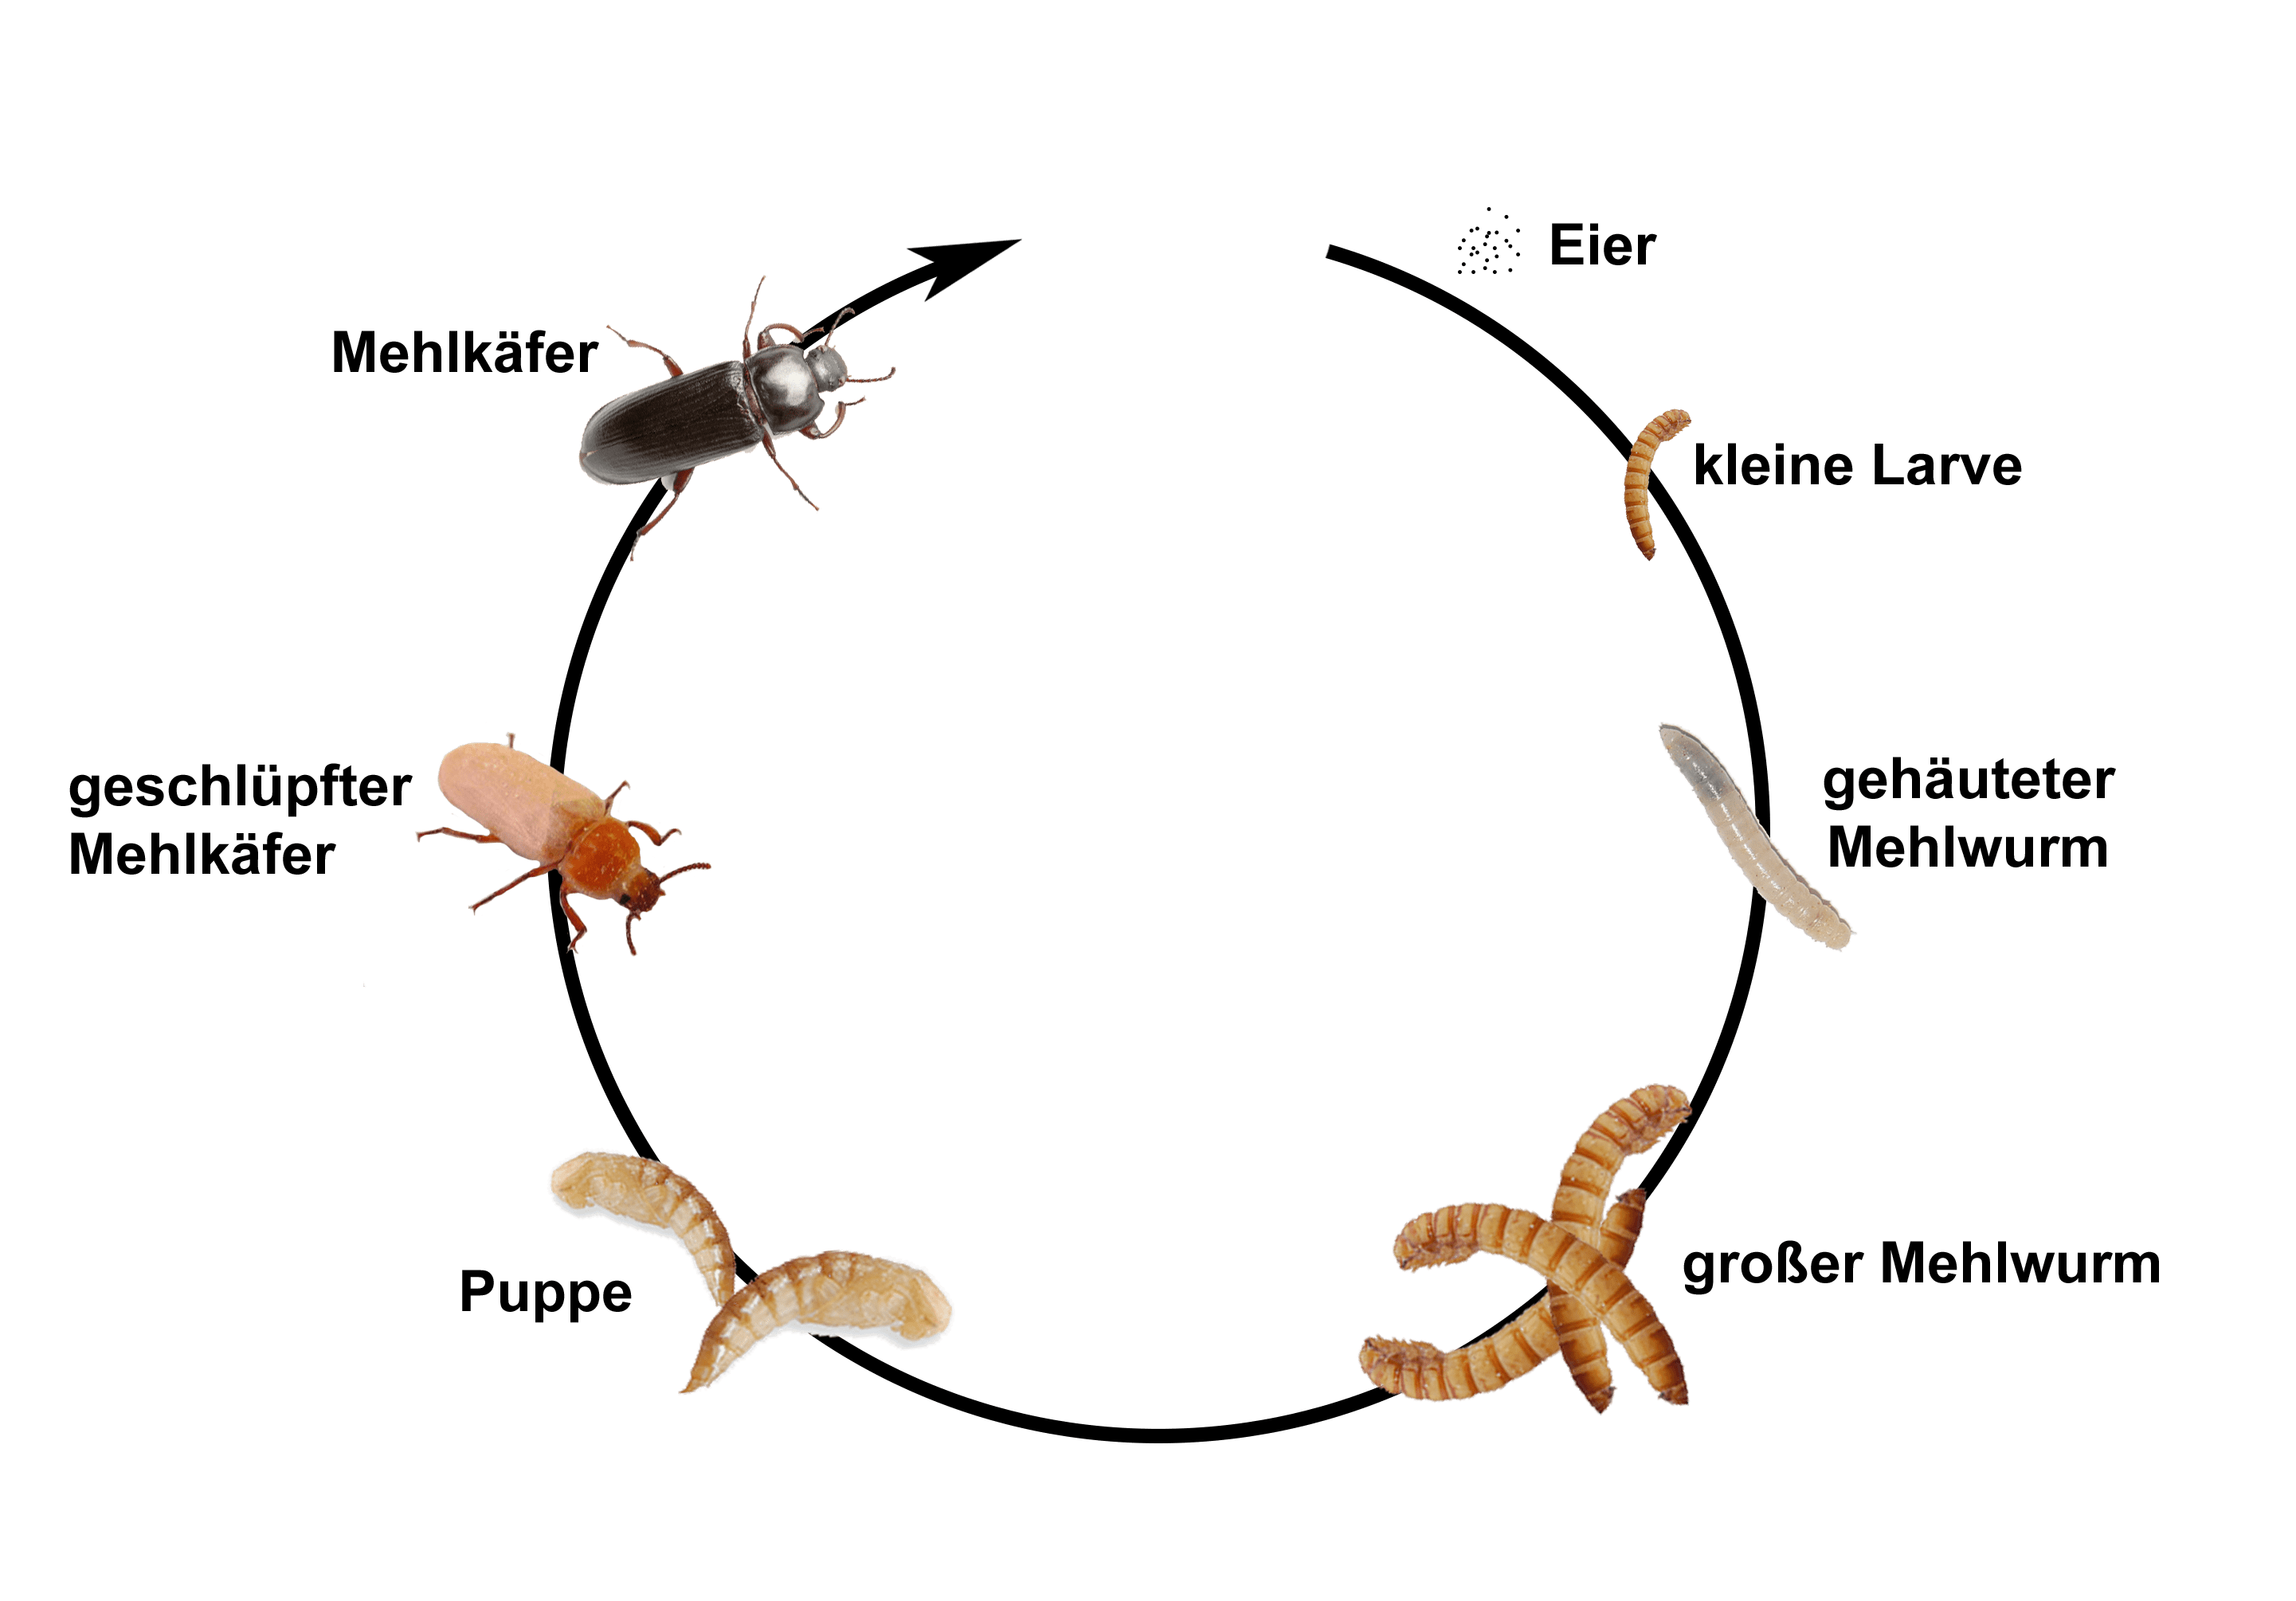
Development:
Mealworms / mealworms have a lifespan of around one year. Of course, the duration depends on the temperature and the food. The adults have a size of approx. 30 mm and have shed their skin 5-14 times in their life. Under optimal conditions, the larvae enter the pupal stage after 2-3 months at the earliest. After a 3-week pupal rest they become flour beetles. The complete metamorphosis, i.e. from egg to beetle, therefore takes 11 weeks. Females lay between 100 and 320 eggs in the course of their lives. The life span of the beetles is 4 to 6 months.
The breeding cultures should be kept at a temperature of about 23–25°C, as the development time depends on the temperature.
Feeding:
They really will eat almost anything. However, I advise against overly moist food (tomatoes, watermelon, etc.), as mold and mites can easily form there.
I personally love using carrots. These can be frozen in portions and can of course also be used for your own tasting. Freezing also has the additional effect that eggs laid on the vegetables or fruit die. You can also simply feed them compost waste, but only enough so that everything is eaten within 2-3 days. It is best to place the wet food and fruit with the soft sides facing the ground so that the larvae can eat their way up from the bottom. With the black beetle it is the other way round and it is best to offer them the fruit with the cut surface facing upwards. You can also add a little brewer’s yeast to balance out the moisture.
I use bran as the main feed for the mealworms. Bran is a collective term for the residue from seed husks left over after sieving the flour during grain processing. The better quality we feed our mealworms, the better feed our animals get. Flour as the sole feed is too fine-grained. This can cause the animals to choke, so it should only be mixed with other food and not fed 100% to the mealworms.
Start breeding:
The upper box with the wire gauze floor is the “love box”. This is where the finished beetles are placed, which mate and lay eggs after approx. 2 weeks. I use oat flakes for the black beetles so that the flakes do not fall through the sieve. There should always be enough moist food in this box. The wire gauze is used to prevent some of the eggs from falling into the next drawer, but at the latest the newly hatched mealworms. This has the advantage that they are no longer at risk of being eaten by the cannibalistic mealworms.
The middle box is intended for rearing mealworms. This is where the high-quality wheat bran is used. Once a week I offer them moist food in the form of carrots. Depending on the number of animals, regular cleaning work is required, especially in this box. The first step is to sieve out the droppings, after which it is best to clean the entire box with water and washing-up liquid.
Due to the different larval stages that the mealworm goes through, you have the right food for almost all sizes.
I use the third container as a “doll’s house”. Beetles and larvae are quite voracious and like to eat each other. They especially like to eat the pupae, as these are relatively defenceless. To keep such deaths to a minimum, I separate them. To do this, I remove all the pupae from the lower container every week and put them in a separate box with a thin layer of oatmeal and a damp cloth to rest them. The pupae can usually be found on the surface of the substrate and can be easily sorted out by hand or with a spoon. I sort out the dead animals at the same time. Healthy larvae are light in color. Black or gray larvae are dead and should be sorted out. A certain number of losses cannot be avoided, but these should be kept within reasonable limits. If large numbers of pupae or worms turn black, the humidity in the containers is most likely too high or too low. It should be between 50 and 70%.
The bottom container is empty and doesn’t need a lid. I simply put the “doll’s house” in it, so it is still space-saving. When I open the mealworm box, I have to put the beetle box to one side and as the bottom is only made of gauze, oatmeal crumbs and possibly mealworm eggs or freshly hatched mealworms fall out. As the mealworm is still a storage pest and will remain so, I don’t take any risks and put the mealworm box on top of the empty container during this time.
Feed mealworms:
You can place a small box in the insectarium and offer the mealworms there. The mantid can then run to it and help itself.
I only give them mealworms with tweezers. Hungry praying mantises quickly get used to tweezers.
If they don’t want them at all, you can try the following. Slightly cut the mealworm with scissors and hold the fresh cut on the mantid’s palps. As a rule, it starts to eat quite quickly and then uses its tentacles to do so.